Steps:
1. Take everything out of the box. Read the diagram explaining what all the parts are
2. There are two sides to the screen: a finished side and an unfinished side. Turn the screen over so that the unfinished side is facing up.
3. Fill a spray bottle with water (no bleach or chemicals) and spray the screen until it is wet but not dripping.
4. Fill a spray bottle with water (no bleach or chemicals) and spray the screen until it is wet but not dripping.
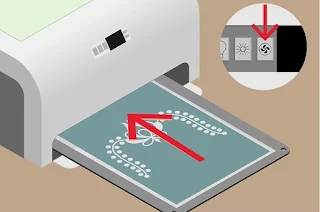
5. Put the newly emulsioned screen in the drying rack and press the fan button.Make sure you time it as the machine does not beep! It usually takes about 20 minutes or longer
6. Print your design on the translucent paper (you can buy designs too).
7. Now take your screen out and peel off the plastic on the emulsion. If the plastic isn't coming off, put your screen back in the drying rack for another 10 minutes or so. A little bit of emulsion is usually going to come off in the corner. When it does just be careful around that area so the rest of the emulsion doesn't come off with it.
8. Tape your design to the glass and place the screen emulsion side down over the design on the pegs. If there are holes in the emulsion, make sure they are not over the design, this will result in holes in your design also. Put the t-shirt platen on the pegs too. Put the cover over the platen and weight down the platen with a 5 lbs weight
9. Use the up, down buttons to set the timer for 8 minutes. Now press the expose button, it looks like a sun
10. When the machine beeps, take out the screen. Now it has your design imprinted on the emulsion. Next, rinse the screen, preferably using the sprayer nozzle. Only rinse the side that the emulsion is NOT on. DO NOT SCRUB.
11. When you've sprayed the screen enough so that the design is clear and the emulsion is green, put the screen in the drying rack and press the drying button. It works best if you dry the screen in the drying rack until it beeps, then take it out and let it air dry for about 2 hours. If you don't have enough time, just dry it once in the drying rack (until it beeps).
12. Now take the screen out and use masking tape around the edges and wherever there are holes that you don't want to appear in your design
13. Attach the t-shirt to the t-shirt platen (just place it on top, do not put the platen in the middle of the shirt).
14. Now put the screen on the emulsion side down on the pegs, put a bead of ink just above the design, and squeegee down while applying pressure to the screen.
15. Take off the platen with the shirt still on it and allow to air dry for 15 minutes.Take the shirt off the platen and hang int to dry for 1-2 hours. When the ink is dry, either iron the design with a cloth over it or tumble dry on a medium heat setting.


No comments:
Post a Comment